It was hella cold the other day. The only thing that really fixes that is having hot pot. But that wasn't really an option so I went for the next best option: chili.
Yup, the yummy comfort food that you want to eat curled up under a fleece blanket with your kitty at your feet while watching hockey.
Normally I'm one of those people that need some kind of recipe to follow when making something I don't usually make, but soup/stew is one of those things where you can be really flexible and throw whatever you have on hand into the pot and it'll still turn out awesome.
I also needed to make enough so that there was just enough for the two of us and not the usual leftover portion to feed another army. You'd be surprised how much finished product you get after you throw in everything even though it doesn't look like it!
Here's what I used (a rough estimate, since I was just guestimating at the grocery store):
------------------------------------
Chili (ali edition) - 3ish servings
------------------------------------
1 large can diced tomatoes (28 ounces I think)
1 medium can of mixed beans
1 small (read:DINKY) can of tomato paste
Ground beef. Whatever kind you have on hand. 300g should be enough
Seasoning spices - black pepper, paprika, chili powder
1/2 cup diced carrots
1/2 cup diced celery
1/2 cup diced onions
2 tablespoons oil
3 large round buns
Just a whee bit of cornstarch
Why do we need round buns? Because I went the extra mile and made an edible serving bowl! YEEEEEEAAAAAAAAAA. More on that later.
--------------------------
Putting it all together
--------------------------
Heat the oil in a pan, and add the diced onions. Cook until translucent, and add the beef. Cook for a few minutes on medium heat, and add whatever seasonings you like. I usually throw in black pepper, paprika and chili powder. When the beef is almost done, add in the diced tomatoes, beans, tomato paste and diced veggies.
Turn the heat down to somewhere in between low and medium and simmer for about 30-45 min. Meanwhile, go enjoy the hockey game
*during intermission*
Come back and check on your chili. If it is a bit watery (I added the entire can of tomatoes including the water), then add some cornstarch dissolved in cold water. It should thicken up.
With the round buns, about 1 inch from the top, cut off the top. Scoop out the inside bread guts - I like to use this as filler with extra meat I bought from the store to make meatballs! But that's for another day. Like I was saying, scoop out the bread guts so that the inside of the bun is hollow.
The chili should be done now, and give a hearty scoop of it into your newly created bread bowl. Oh, we went back for refills a few times using the same bowl but there was enough leftovers for one REALLY hearty lunch.

Enjoy!
I love Foodgawker. It's a mish mash of wonderful food ideas submitted by people all around the world. Granted, all these delicious looking posts may not actually taste delicious, but it's sure helluva fun time staring at all of them!
Lately most of the new things I've tried have come from this website. The latest experiment? Puff pastry with beef filling, from A Bit of This and A Bit of That. No, there is no official name for it. At least I couldn't find it on the website.
Here's the picture of what it was supposed to look like:
Did mine turn out looking like that? Nottttttt quite. But I tried.
Anyways that's besides the point. The point is that it was quite straight forward to make (with some oopsies thrown in) and it was helluva yummy. Even the bf enjoyed it (he IS too nice to say if something does taste bad tho .. but the compliment seemed geniune so I'LL TAKE IT!!). It was fun listening to him guess on what on earth I was trying to make.
Here's my take on it:
--------------------------------------------------------------------------------
Puff pastry with beef filling (ali edition. Adapted from original posting)
--------------------------------------------------------------------------------
This wonderful snack, if you could call it a snack (it feeds like a meal for two people), has two parts - the pastry and the filling. It's not really puff pastry (it's healthier!), but you could probably use store bought puff pastry instead.
------
Pastry
------
300g white flour
125g butter
1/2 teaspoon salt
1/4 cup + 3 tablespoons water
1 egg yolk + 1 egg white
1 tablespoon milk
*Notes: I used butter instead of shortening/lard because that's all I had on hand.
----------
Beef filling
----------
200g cooked ground beef
Pinch of salt, pepper, paprika, chili powder, whatever you feel like seasoning your beef
2 tablespoons oil
1/2 cup diced onion
*Notes: You can optionally add some ginger, diced celery, cabbage, capsicum. I didn't have any of that stuff but I guess it would make it yummier. Also, don't be too generous on the beef. I estimated about 300g raw beef but after assembling it all together, I found there was TOO much meat. I also used extra lean ground beef, but you can use whatever you'd like. Fattier beef makes for a yummier end product :P
---------------------
Putting it all together
---------------------
You're going to want to make the beef filling first. Add the oil to a heated pan and cook the ground beef, breaking up the pieces as best as you can. Cook the onions (and ginger if you're using it), and throw in the beef. Add the spices, and cook for about 5 minutes. Try not to dry out the meat as it'll be sitting in an oven for some time. It probably wouldn't hurt to undercook it a bit. Once it's mostly cooked, transfer it to a bowl and set aside.
Now sift together the flour and the salt. Mix together with the butter (I melted it in the microwave straight from the fridge - don't make it too hot tho). Add the water in and start to knead together into a dough. Once it's a nice ball of dough, let it sit for about 15min
*fast forward 15min*
Sprinkle some flour on your work surface and roll out the dough into a rectangle-ish shape. I got no idea how big but the recipe said to smush it out so it's about 3-5mm thick. I just kind of guestimated.
Cut the dough into three progressively bigger rectangles. Roll the first rectangle along its length (rolling like it like it's a sheet of wrapping paper). Place this first roll at the bottom of the next larger rectangle (kind of like joining them) and continuing rolling so that the first roll is enclosed in the second one. Now do the same with the third. Tuck the ends of the roll inside and press firmly. At this point you're supposed to refrigerate for 2hours but I totally missed that step while making it (oooopsie) so I just stuck it in the freezer for about 10 minutes.
Here is a very helpful picture from the original posting:

*fast forward 10min*
Take the dough out from the fridge (or freezer), and roll it out into a 15x6 inch rectangle (personally, I just rolled it out into a rectangle until it was thin enough). Spread the filling out lengthwise over the dough. Fold the left part of the dough over the filling, and spread some egg white over the edge before folding the right part of the dough on top (the egg white will help it stick together).
At this point, you should preheat the over to about 250F.
Bend into a "U" shape and move it to a baking sheet. THIS is where some blunders happened. My overestimation of meat meant that it was so bloody hard to bend it into a "U" shape (ended up being just a "bend" lol). That, and I probably didn't make the dough long enough to make it bend into a "U" shape. Oh, and you SHOULD use a cookie sheet instead of a lame aluminum foil baking sheet because the thing is DAMN heavy (you'll have to use hands to support the bottom or else byebye snack!).
Before transferring to the oven, mix the egg yolk and the milk together to make egg wash. Brush the egg wash over the top of the pastry so that it will give it a nice brown top and will help prevent it from burning. Take a sharp knife and make cuts into the pastry that are around 1-1.5inches apart.
Originally, I baked this blob for about 40min at 200F. BUT, I did notice that after 40min, it didn't look like it was really browning, so I jacked up the heat to 450F and let it cook for another 10min and it became a nice brown. Next time I will probably bake it for 30min at 250F and see how brown the top gets and crank up the heat to give it a nice brown top for a few minutes.
And here is how mine turned out:
I know, I know, it doesn't look nearly as nice as the original posting. But it was hella good. And I'd totally make it again.
Enjoy!
So we ventured into new territory and tried to cook something out of our comfort zone (pasta, steak, general gwai-lo food).
Him: What are we having for dinner?
Me: I want to try something new!
Him: Uhh .. ok .. (worried look)
Me: DUMPLINGS!
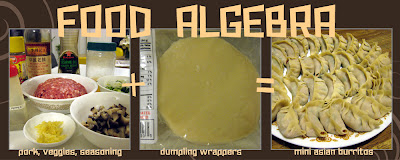
It was actually really fun! Honest. I had scoured for dumpling recipes, combing through the websites with the nicest looking dumpling pictures (biased, I know) and seeing what combination of ingredients we would use. We settled for the following (mainly because it was whatever was in the fridge)
- store bought dumpling wrappers (too risky to mess up if made from scratch)
- lean ground pork
- green onion- shittake mushrooms
- egg wash (for the wrapper edges)
- sesame oil
- soy sauce
- chicken broth
- salt
- 5 spice powder
- black pepper
I kind of wanted to document the process, but he's not exactly one of those ppl who snap pictures of food on a minutely basis like me so I ended up snapping a few photos (read:took 3 pics in total) of the process. In the process I came up with ... FOOD ALGEBRA! Lo and behold, my brain child creation. Mash 2 things together and end up with an end result:
How did they turn out? Not bad, for a first try. But a few things to change up for next time:
- Cornstarch. Or flour. The filling ended up too dry
- Seasoning. More. Lots more. Salt really does do wonders, no matter how much I try to erase it from my diet. Could have used a bit more of everything
- Better proportion. We couldn't really taste the veggies. It should be like, 2 parts veggie and 1 part meat! That, and you don't want to taste all meat and no wrapper. Need to half the amount of filling per dumpling. A few were really beefy (well, porky)
Early on we realized that assembly line formation would be the best way to do this. He would plop the filling in and grease the edges, and I would fold. My origami skills from way back seem to have paid a helping hand, since they looked pretty presentable. It was a fun couple-y experience!
A side note: My Photoshop skills are pretty lame. But I get around. The above Food Algebra pic was put together with Photoshop 6 (yup, ancient stuff). Pics were taken with my Canon P&S and the background was created by DragonArtz (based on their Creative Commons License)
Super Sushi House
1891 Kennedy Rd
Scarborough, Ontario
Cuisine(s): Sushi, Bento Boxes
Date visited: July 2010
So yesterday we were supposed to go to our usual sushi dig, Ama Sushi (AYCE), but we were still full from lunch and decided to hit up something new. I've seen this place dozens of times seen good reviews about it. Here's our (my) take on it:
Food: 3/5
For all sushi restaurants, the key, absolute key, is the spicy salmon roll. We ordered spicy salmon and hamachi (yellow tail) maki, red dragon and edamame. The edamame was nice and crunchy with some salt to boot (we forgot to ask for it sans-salt, as we find it tasting just as good). The price for the "simple" maki's were quite cheap, so I had my suspicion that the outer part would simply be the seaweed, and not another layer of rice. Yup, I was right. The "spicy salmon" was disappointing - not spicy at all, and the rolls weren't very big (well, for the price I guess it's what you'd expect). Hamachi was alright. The only good thing was the red dragon roll. In fact, it was really good. The salmon, avocado and tobiko on the cali rolls were very generous and it was really good.
Service: 3/5
Service here was good to start. The fellow was quick to take our order, he said "you're welcome" to every "thank you", and topped our tea frequently. The woman however, lacked any kind of enthusiasm. No smiling, very robotic. As our meal progressed, it took more than 5 minutes to get anyone to recognize our attention-seeking gazes so we could order another roll. The place is quite small and all tables visible so it's not like they couldn't see us. They didn't come back to check up on us after food was served nor did they come top off our tea. We were hoping to get a scoop of green tea ice cream, but the kicker was that the woman brought us the bill without us asking and when I asked if we could just get it added to the bill, she did not understand. How hard is it? The bf's mood was spoiled and he said to forget it, so we paid and left. As we were leaving, she looked up from the cashier and without a smile said "thank you". Do you really take it as a "thank you" if it's robotic without any emotion?
Atmosphere: 3.5/5
The restaurant sits on the corner of a busy plaza at a busy intersection. From the outside it looks a bit sketchy but when you enter it looks like a decent japanese restaurant. There weren't too many tables (maybe 10?) to generally seat 2 or 4 people. It looked clean (enough), and decor was average. You could see the people preparing the sushi which is always kinda nice. Didn't hit up the washrooms.
Price/Value: 4.5/5
This place was quite cheap compared to some of the places we've eaten at. The "simple" maki (6) rolls ranged from 2.99 to 3.99 but they're quite small. The "special" ones like red dragon and soft shell crab came in 8 and were about $8. However, there was a lack of selection for the "special" ones. The menu offers bento boxes for an extremely low price - ~$10 for soup, salad, salmon/beef/chicken teriyaki, rice, 6 cali rolls and dessert (there might be another item in the deal). Even the "dine-in special" looked like a good deal - for $14.50 you get up to 27 (pre-selected) pieces of sashimi and rolls (some specials include hand rolls). In total we paid like $32 for edamame, "spicy salmon" maki, hamachi maki and 2 orders of red dragon. Not a bad deal.
Overall dining experience: 3/5
For us, the food wasn't that great and the service was the clincher. Had the spicy salmon rolls actually been spicy and a bit bigger of a portion (I don't mind paying more for bigger rolls, but I guess that's how they roll here), and had the lady server been nicer/more attentive/smiling, then we would have enjoyed it more. Despite the cheap price, I don't think we'll return.
I was watching Food Network just now and there's a show called The Best Thing I Ever Ate: Chocolate, and the guests talk about the best chocolate things they've ever eaten. One of them described a creme brulee chocolate at a little chocolatier shop in New York.
Oh good heavenly mercy. Creme brulee. And chocolate. Put together.
I must go back to New York.
Kee's Chocolates
http://www.keeschocolates.com
Their macaroons look quite delicious too :)


